In this post, we look at rapidly prototyping a PNG image encoder in Python.
The aim is to create a PNG encoder that does not rely on any code not available within the Python standard library, and in doing so learn a bit about the internal structure of the PNG format.
You should already be familiar with what a PNG file is and with basic image transmission concepts.
All of the code required is given in this post, however a repository of the complete program can be found on GitHub.
First let's summarise some information on the PNG format specification, mostly found by reading the standard at www.w3.org/TR/PNG/
The minimum mandatory chunks are a header (chunk type "IHDR"), image data ("IDAT"), and an image trailer ("IEND"), appearing in that order.
| Offset | Length | Field |
|---|---|---|
| 0 | 4 | Length - number of bytes in data field |
| 4 | 4 | Chunk Type - four ASCII alphabetic characters |
| 8 | n | Data Field |
| n+8 | 4 | CRC check value |
| Offset | Length | Field |
|---|---|---|
| 0 | 4 | Width - image width in pixels |
| 4 | 4 | Height - image height in pixels |
| 8 | 1 | Bit Depth - bits per colour plane per pixel - 1, 2, 4, 8 or 16 |
| 9 | 1 | Colour Type - 2 = Truecolor RGB with 8 or 16 bits per colour per pixel |
| 10 | 1 | Compression Method - always 0 [3] |
| 11 | 1 | Filter Method - always 0 [3] |
| 12 | 1 | Interlace Method - 0 = none, 1 = Adam7 interlace |
The data field contains the compressed image data as output by the compression algorithm.
This marks the end of the file and has an empty (zero length) data field.
PNG uses an LZ77 based compression algorithm called Deflate.
Working in Python 3 allows us to hand-wave over the details of the compression algorithm [4], as Python provides an implementation called zlib within it's standard library. [5] Conveniently, the zlib library is even able to calculate CRC values for all of our chunks for us.
We will be following the common code pattern defined by use of a main() function. Since we are using the zlib library we are sure to import it at the top of our file. Our first piece of code creates a bytes object holding the signature values defined in the standard.
import zlib

def main():
    signature = bytes( (137, 80, 78, 71, 13, 10, 26, 10) )

    print(signature)

if __name__ == "__main__":
    main()
Following tables 1 and 2 above, we create a function to take any data and build it into a chunk, and another to generate the data for an IHDR header chunk.
def make_chunk(type, data=b""):
    b = len(data).to_bytes(4, byteorder="big")  # Length of Data
    b += bytes(type, "ascii")                   # Chunk Type
    b += data                                   # Data Field
    crc = zlib.crc32(bytes(type, "ascii"))
    crc = zlib.crc32(data, crc)
    b += crc.to_bytes(4, byteorder="big")       # CRC
    return b

def make_header(width, height):
    b = width.to_bytes(4, byteorder="big")    # Width
    b += height.to_bytes(4, byteorder="big")  # Height
    b += (8).to_bytes(1, byteorder="big")     # Bit Depth
    b += (2).to_bytes(1, byteorder="big")     # Color Type = Truecolor
    b += (0).to_bytes(1, byteorder="big")     # Compression Method
    b += (0).to_bytes(1, byteorder="big")     # Filter Method
    b += (0).to_bytes(1, byteorder="big")     # Interlace Method = None
    return b
We can now add a call to these functions into main() to show them working.
def main():
    [...]

    chunk_ihdr = make_chunk("IHDR", make_header(width=4, height=4))

    print(chunk_ihdr)
Running this will output a string of gobbledygook, but if you examine it closely you will find it corresponds to the data structures defined above - note the two instances of "\x04" denoting the width and height, and "\x08\x02" for the bit depth and colour format bytes.
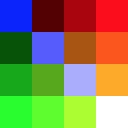
We will create a simple 4 x 4 image. The red channel increases from left to right, the green channel increases from top to bottom, and the blue channel has a diagonal stripe from upper left to lower right. These interact to create an easy to visualise colour gradient that we expect to see in the output image.
    red =   [   0,  85, 170, 255,     0,  85, 170, 255,     0,  85, 170, 255,     0,  85, 170, 255 ]
    green = [   0,   0,   0,   0,    85,  85,  85,  85,   170, 170, 170, 170,   255, 255, 255, 255 ]
    blue =  [ 255,   0,   0,   0,     0, 255,   0,   0,     0,   0, 255,   0,     0,   0,   0, 255 ]
Interlacing splits the image into a series of reduced resolution images that collectively build the whole image. [6] Interlacing is not mandatory so we will skip over implementing it today.
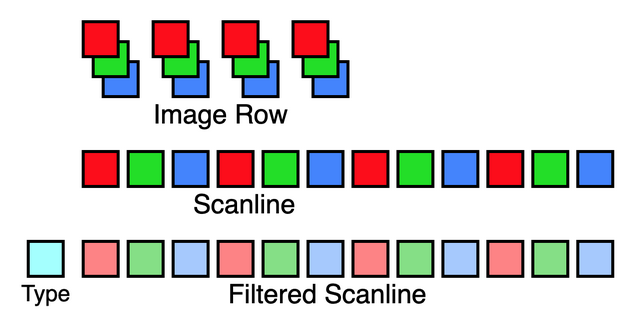
The image is taken as a series of scanlines - each scanline represents one horizontal row of pixels.
For truecolor images, the colour channels are interleaved into a single scanline, see figure 1. [7]
To generate a scanline, we take all the colour planes for an image, index into them to find a specific line, and interleave the colour values from each.
def get_scanline(line_number, width, planes):
    start = line_number * width
    scanline = []
    for i in range(start, start+width):
        for p in planes:
            scanline.append(p[i])
    return scanline
By passing the colour planes in within a list, the function is able to loop over them regardless of how many there are - the standard allows for any number from 1 to 4. [8]
The next stage is called filtering and is designed to help maximise the compression ratio. [9]
The output values of a filter may be different from the scanline that was input, but the number of bytes of data will be the same, with a single additional byte prefixed to indicate the filter type used.
The simplest 'filter' to implement is filter 0, which does not change the data - we only prepend a zero byte to the data bytes for each scanline.
def filter_0(scanline):
    return [0] + scanline
The data from all consecutive filtered scanlines is concatenated into a big blob that is passed through the zlib compression algorithm, the output of which is wrapped in an IDAT data chunk to be written to the final file.
pass_image() loops over each line of the image, generating a scanline, filtering it and concatenating it into a blob.
def pass_image(width, planes):
    lines = int(len(planes[0]) / width)
    blob = []
    for i in range(0, lines):
        scanline = get_scanline(i, width, planes)
        filtered = filter_0(scanline)
        blob += filtered
    return blob
Back in main(), we take the blob, zlib compress it, and wrap it in a chunk.
def main():
    [...]

    blob = pass_image(width=4, planes=[red, green, blue])
    data = zlib.compress( bytes(blob) )
    chunk_idat = make_chunk("IDAT", data)

    print(chunk_idat)
The final piece we need is an IEND trailer chunk, easily created with make_chunk() as no data is needed.
To create our PNG file, we write the various parts out to a file in the correct order.
    chunk_iend = make_chunk("IEND")

    print(chunk_iend)

    with open("test.png", 'wb') as file:
        file.write(signature)
        file.write(chunk_ihdr)
        file.write(chunk_idat)
        file.write(chunk_iend)
Running this code should reward you with your very own PNG file, which should look like the one shown in figure 2 if you use the same image data. You may have to zoom in a lot to see it as it is only 4 pixels wide!
In this post, we have developed a basic understanding of the PNG format and how to implement an encoder. Once you look closely at it, PNG is actually a fairly simple format, that makes good use of an established compression format.
A repository containing the code demonstrated in this post is available on GitHub.
The signature uses a fascinating choice of byte values designed to detect corruption caused by the file being accidentally transfered through text conversion processes. The signature will be corrupted, and so no longer recognisable as valid, if subject conversion in either direction between CR-LF and LF line endings, or if truncated to 7 bits. See RFC 2083 section 12.11
Chunking is commonly used to break multimedia files into independent sections that have their own headers giving information about the chunk and it's size. You may be familiar with chunking from other media formats such as WAV and AIFF.
Note that compression and filter methods given in the header are always 0, as specified by the standard. These fields allowed for future expansion of the standard, but as of 2021 the original compression and filtering algorithms are the only ones available.
See information on Deflate on Wikipedia
While the PNG standard specifies the parameters to be used by the zlib compression algorithm, these correspond exactly to the defaults used in the zlib standard itself, so zlib does not need to be set up to meet the PNG specification.
Interlacing allows rapid display of a low resolution preview of the image before the whole file has been recieved or processed. When interlaced, PNG reduces the image to seven smaller images of increasing size. Each of the reduced images is passed through the scanline and filter process as with a non interlaced image.
Interleaving of colour values is not clearly stated in the text of the standard on my reading, however inferring this is how it works and trying it out produced the expected results.
A PNG image can have from one to four colour planes: one for grayscale, two for grayscale with alpha transparancy, three for RGB colour, or four for RGBA colour with alpha transparency.
In addition to filter 0 that does not change the data, four other filters are available for encoding. They work by trying to predict the next pixel value based on pixels to the left and above. The output data then becomes the difference value between the prediction and the real value. Depending on the image content, this can cause much of the filter output to be values close to zero, which may be able to be compressed further than the original values. PNG is nevertheless a lossless format as the entire filtering and compression process can be reversed completely.